Make Your Hugo Site Installable & Offline-Ready (PWA Tutorial)
Technical Archive
This article discusses the previous version of this blog, which was built with Hugo. The site is now powered by Astro. While the security concepts explored here remain valid, specific implementation details related to Hugo no longer apply to the live site.
In this article, I will introduce the concept of a “Progressive Web App” (PWA) and explore its advantages over classic web applications. Then, I will detail how I transformed my Hugo blog into a PWA, highlighting the specificities of each platform, so you can apply the same transformation to your own website.
What is a PWA?
Let’s begin by defining what a PWA is. It is an application built using web platform technologies (typically HTML, CSS, and JavaScript) that offers a user experience similar to a platform-specific app (think of a native app installed from the Google Play Store on Android or the App Store on iOS).
Progressive Web Apps boast several key features:
-
Cross-platform compatibility: With a single codebase, PWAs run on multiple platforms (Linux, Android, Windows, macOS, iPadOS) and devices (desktops, tablets, smartphones).
-
Offline capability: Thanks to a Service Worker—a key component of PWAs—resources are stored in a cache, allowing the app to function even without an internet connection.
-
Installability: Web browsers automatically detect PWA capabilities and prompt users to install the website like a native application (iOS has specificities I will detail later). Users get an app-like interface with a splash screen, icons, gestures, and native animations.
-
Trust and safety: PWAs must be served over HTTPS, guaranteeing data security and integrity.
-
Discoverability: Since it remains a website, your application and its pages can be indexed and reached directly via search engines.
-
Automatic updates: PWAs benefit from the web’s greatest strength: they update automatically. Unlike native apps, users don’t need to manually download updates.
-
Store independence: PWAs are installable directly from the browser, bypassing app stores.
In short, to turn your website into a Progressive Web App, you need three main elements:
-
A manifest file: A JSON file defining the app’s metadata (name, icons, path, etc.).
-
A Service Worker: A script to handle caching and offline functionality.
-
App Icons: While technically optional for a website, they are mandatory for a polished installable experience.
You also need to reference the manifest and service worker in your HTML. Additionally, your website must be responsive (adapting to laptops, tablets, and smartphones) and served over HTTPS.
The webmanifest.json
Check the MDN web docs for a complete list of manifest properties. This file is typically stored at the root of the website.
Create a file named webmanifest.json in your static folder. Below is the content I use for my website, which you can use as a template:
{
  "lang": "en",
  "name": "LaRomierre",
  "short_name": "LaRomierre",
  "description": "The blog LaRomierre",
  "start_url": "/",
  "scope": "/",
  "background_color": "#929295",
  "theme_color": "#F5F5FA",
  "display": "standalone",
  "icons": [
    {
      "src": "/icons/pwa-64x64.png",
      "type": "image/png",
      "sizes": "64x64"
    },
    {
      "src": "/icons/pwa-192x192.png",
      "type": "image/png",
      "sizes": "192x192"
    },
    {
      "src": "/icons/pwa-512x512.png",
      "type": "image/png",
      "sizes": "512x512"
    },
    {
      "src": "/icons/pwa-512x512.png",
      "sizes": "512x512",
      "type": "image/png",
      "purpose": "maskable"
    }
  ],
  "shortcuts": [
    {
      "name": "Decap CMS",
      "description": "CMS to add or edit blog posts",
      "url": "/admin/index.html",
      "icons": [
        {
          "src": "/icons/decap/pwa-192x192.png",
          "type": "image/png",
          "sizes": "192x192"
        }
      ]
    },
    {
      "name": "Tech posts",
      "description": "The page containing the tech posts",
      "url": "/categories/tech/",
      "icons": [
        {
          "src": "/icons/tech/pwa-192x192.png",
          "type": "image/png",
          "sizes": "192x192"
        }
      ]
    },
    {
      "name": "Management posts",
      "description": "The page containing the management posts",
      "url": "/categories/management/",
      "icons": [
        {
          "src": "/icons/mgmt/pwa-192x192.png",
          "type": "image/png",
          "sizes": "192x192"
        }
      ]
    }
  ]
}
Focusing on Manifest Elements
The Icons
The icons defined in the manifest serve multiple purposes: identifying the installed app, generating the splash screen, appearing in the taskbar or dock, and in the app switcher (e.g., cmd+tab on macOS).
You likely noticed I defined multiple icons. This allows the system to choose the most appropriate size for the context. I highly recommend experimenting with this: try creating monochrome icons—a yellow square for 64x64, a red one for 128x128, etc.—to see exactly which icon is used where.
![]()
On an Android smartphone, with no maskable icon defined
![]() On an Android smartphone, with a maskable icon defined
On an Android smartphone, with a maskable icon defined
To create these assets easily, I recommend maskable.app to visualize how your icon looks when masked (rounded/shaped by the OS). I also use the assets-generator from vite-pwa, which can generate all necessary sizes from a single input image.
The purpose parameter is crucial. any (default) means the icon can be used anywhere. maskable indicates the icon is designed to be safely cropped (e.g., into a circle on Android) without losing information. monochrome is used for specific UI contexts like status bars.
Display Modes
The display parameter controls how immersive the app feels.
-
fullscreen: The app takes over the entire screen. System bars are hidden. -
standalone: Looks like a standard native app. The status bar (battery, clock) remains visible, but browser navigation controls are hidden. This is the most common choice for PWAs. -
minimal-ui: Retains some browser controls (like navigation). -
browser: The app opens in a standard browser tab. Crucially, this mode disables the installation prompt.
Splash Screen
On Android, the system generates a splash screen using the background color and the icon defined in your manifest. Android prioritizes icons with the purpose: "maskable".
The splash screen on Android devices
Shortcuts
The shortcuts section defines quick actions accessible via a long-press on the app icon (Android/iOS) or right-click (Desktop). In my manifest, I added shortcuts to specific blog categories and my CMS admin panel.
Referencing the Manifest
Finally, link the manifest in your HTML <head> section (usually in layouts/_default/baseof.html or layouts/partials/head.html in Hugo):
<link rel="manifest" href="/webmanifest.json">The Service Worker
The Service Worker fulfills the “offline” promise. It is a JavaScript file (e.g., service-worker.js) placed at the root of your site that intercepts network requests.
The code below implements a strategy where:
-
On Install: It caches a specific “Offline” page.
-
On Fetch: It checks the cache first. If a page is cached and not expired (2 hours in this example), it serves it. Otherwise, it fetches it from the network, updates the cache, and serves it.
-
Fallback: If the network is unavailable and the page isn’t cached, it serves the
/offline/page.
const CACHE_NAME = 'laromierre_cache_v1';
const CACHE_DURATION = 7200; // 2 hours

self.addEventListener('install', function (event) {
  event.waitUntil(
    caches.open(CACHE_NAME)
    .then(function (cache) {
      return cache.addAll(['/offline/']);
    })
  );
});

self.addEventListener('fetch', function (event) {
  // Exclude extensions, localhost, and admin sections
  if (event.request.url.startsWith('chrome-extension://') ||
      event.request.url.includes('localhost') ||
      event.request.url.includes('/admin/')) {
    return;
  }

  event.respondWith(
    caches.match(event.request).then(function (response) {
      if (response) {
        const headers = response.headers.get('date');
        if (headers) {
          const expirationDate = new Date(headers).getTime() + CACHE_DURATION * 1000;
          if (new Date().getTime() > expirationDate) {
            return fetchAndUpdateCache(event.request);
          }
        }
        return response;
      }
      return fetchAndUpdateCache(event.request);
    })
  );
});

function fetchAndUpdateCache(request) {
  return fetch(request).then(function (networkResponse) {
    if (networkResponse && networkResponse.status === 200) {
      const clonedResponse = networkResponse.clone();
      caches.open(CACHE_NAME).then(function (cache) {
        cache.put(request, clonedResponse);
      });
    }
    return networkResponse;
  }).catch(function () {
    return caches.match('/offline/');
  });
}
Registering the Service Worker
Add this script to your HTML (typically in the footer or strictly inside the <body>):
<script>
    if ('serviceWorker' in navigator) {
        window.addEventListener('load', function () {
            navigator.serviceWorker.register('/service-worker.js')
                .then(reg => console.log('SW registered!', reg.scope))
                .catch(err => console.log('SW registration failed:', err));
        });
    }
</script>
Testing with Lighthouse
To verify your PWA, use Google Chrome DevTools. Right-click > Inspect, then go to the Lighthouse tab. Ensure “Progressive Web App” is checked and run the analysis.
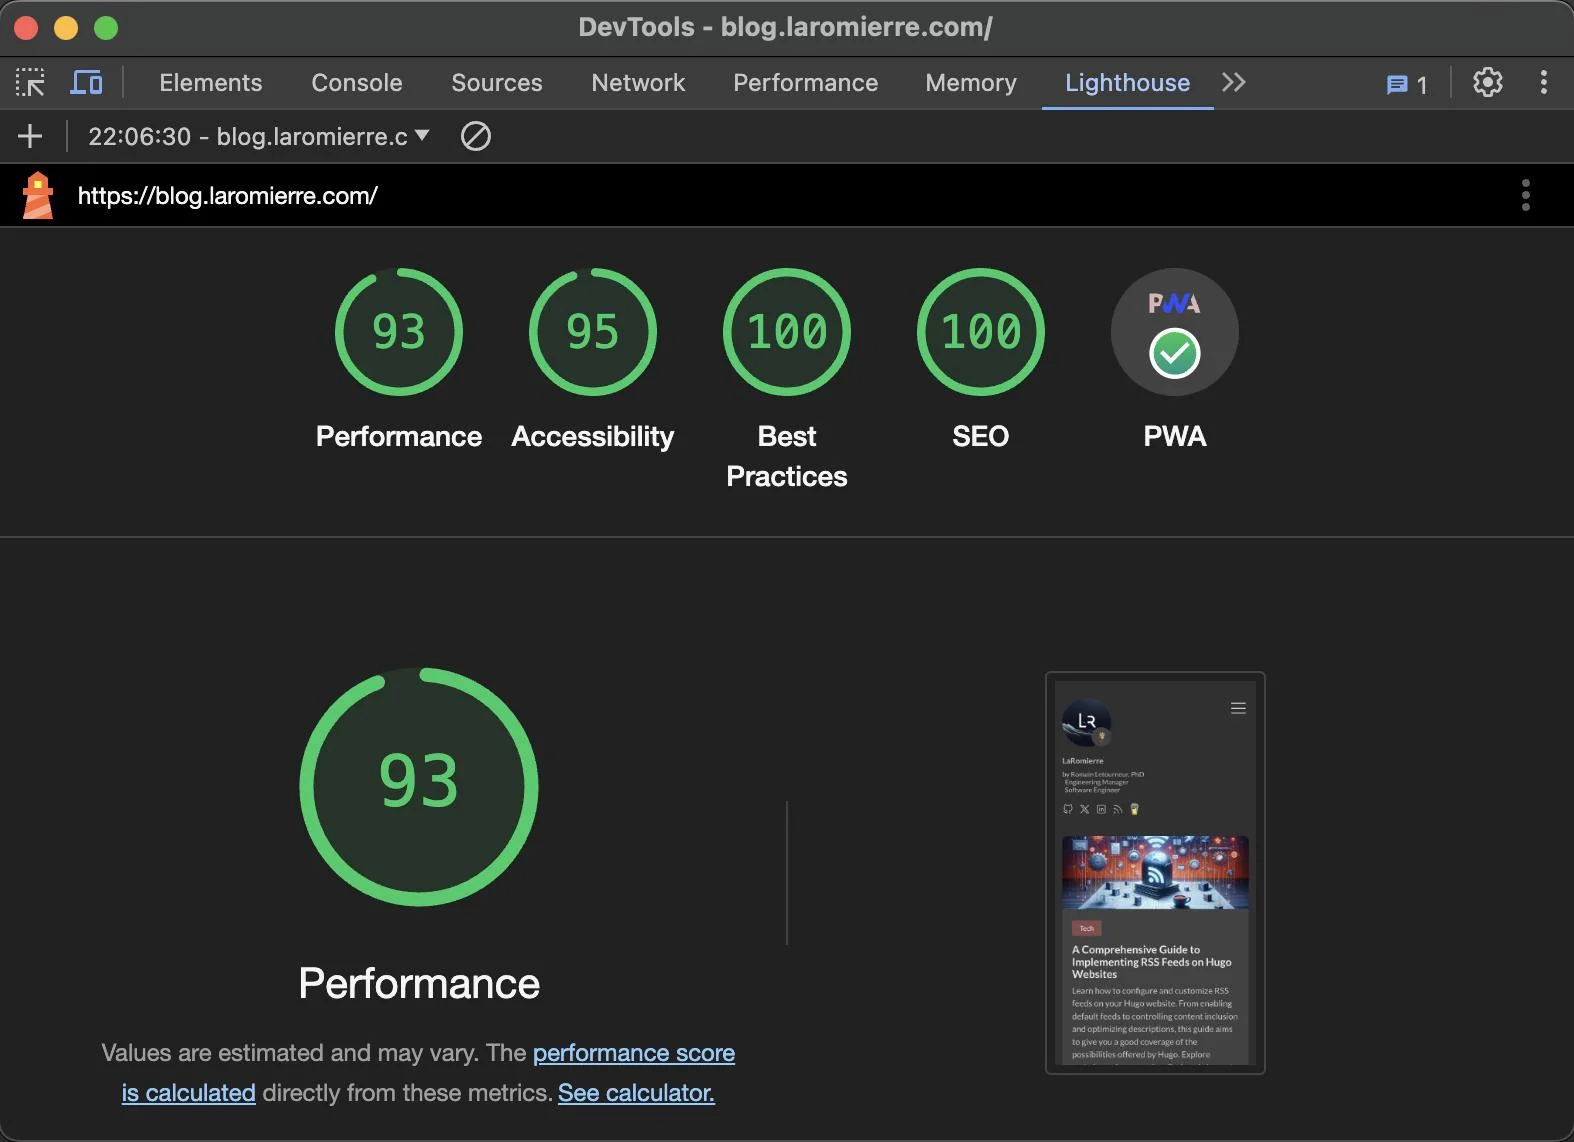
Lighthouse will validate your manifest, service worker, and security (HTTPS), providing a checklist of any missing requirements.
App Installation Across Devices
Desktop (Chrome & Edge)
Chrome and Edge offer the best support. An install icon appears in the address bar. Once installed, the app integrates with the OS (Start menu, Spotlight). Right-clicking the dock icon even shows the shortcuts defined in your manifest!
Firefox
Mozilla dropped PWA support in Firefox 85 (2021). You cannot install PWAs natively with Firefox.
iOS (iPhone & iPad)
iOS supports PWAs but with limitations. There is no automatic “Install” prompt. Users must manually tap Share > Add to Home Screen.
While iOS support is improving, it requires specific optimizations (like defining apple-touch-icon links in your HTML, as iOS doesn’t fully rely on the manifest for icons yet). I will cover iOS specificities in a dedicated future article.
Wrap Up
In this article, we covered the PWA essentials: the Manifest, the Service Worker, and the installation process. By transforming your Hugo blog into a PWA, you improve performance, enable offline reading, and increase user engagement.
Hope this helps you build your own!
References
-
Preview the appearance of your icon once masked with maskable.app
-
article “Firefox 85 is Here, But Mozilla is Killing PWA Features” on thurrott.com
-
article “Apple confirms it’s breaking iPhone web apps in the EU on purpose” on techcrunch.com
-
article “Apple reverses decision about blocking web apps on iPhones in the EU” on techcrunch.com
-
article detailing the current level of support of pwa functionalities on iOS devices, on firt.dev
-
discussion on the implementation of pwa on hugo, on discourse.gohugo.io
In a [[previous article]], I extensively covered the topic of Progressive Web Apps (PWAs): what they are, the guarantees they provide...
Dans un [[article précédent]], j'ai largement couvert le sujet des Progressive Web Apps (PWA) : ce qu'elles sont, les garanties...