Homelab Backup Strategy: Restic, Windmill, Garage S3 and PG Back Web
My homelab has grown significantly over the years: a homepage, a private DNS / ad-blocker, a to-do list, code quality tools, security audits… No fewer than 75 entries that Uptime Kuma monitors daily, spread across a dozen servers.
For some of these services, data resilience is critical. I’m thinking in particular of Paperless-NGX for my administrative documents, Immich for my photos, and above all Vaultwarden for my passwords.
Honestly, setting up backups is clearly not the first thing that comes to mind. The probability of losing data generally stays low, but shit happens: an SSD that gives up the ghost, a server that fries due to a power surge, a burglary. And when that day comes, it’s better to be prepared, or risk losing data forever.
I’m sharing here the topology of my homelab, the backup strategy I’ve put in place, the technologies involved and how everything is orchestrated, before talking about restoration.
Homelab Topology
There’s no single viable backup strategy. It all depends on your level of paranoia, the number of services, servers, and how much trouble you’d be in if everything disappeared tomorrow. Before diving into the details of my strategy, here’s what my homelab looks like today.
My services run on Docker Compose. A good compromise compared to heavier solutions like k3s or Docker Swarm, where distributed storage issues arise quickly and considerably increase the daily investment. They’re spread across a dozen servers to minimize the average load on each:
| Server | Main role |
|---|---|
| server_1 | Reverse proxy, authentication (Traefik, Authelia) |
| server_2 | Monitoring, alerting (Grafana, Uptime Kuma) |
| server_3 | Documents, photos (Paperless-NGX, Immich) |
| server_4 | Dev tools (Forgejo, SonarQube, Windmill) |
| server_5 | Various services (Vaultwarden, FreshRSS, …) |
| server_6, server_7, server_8 | Garage S3 nodes (remote) |
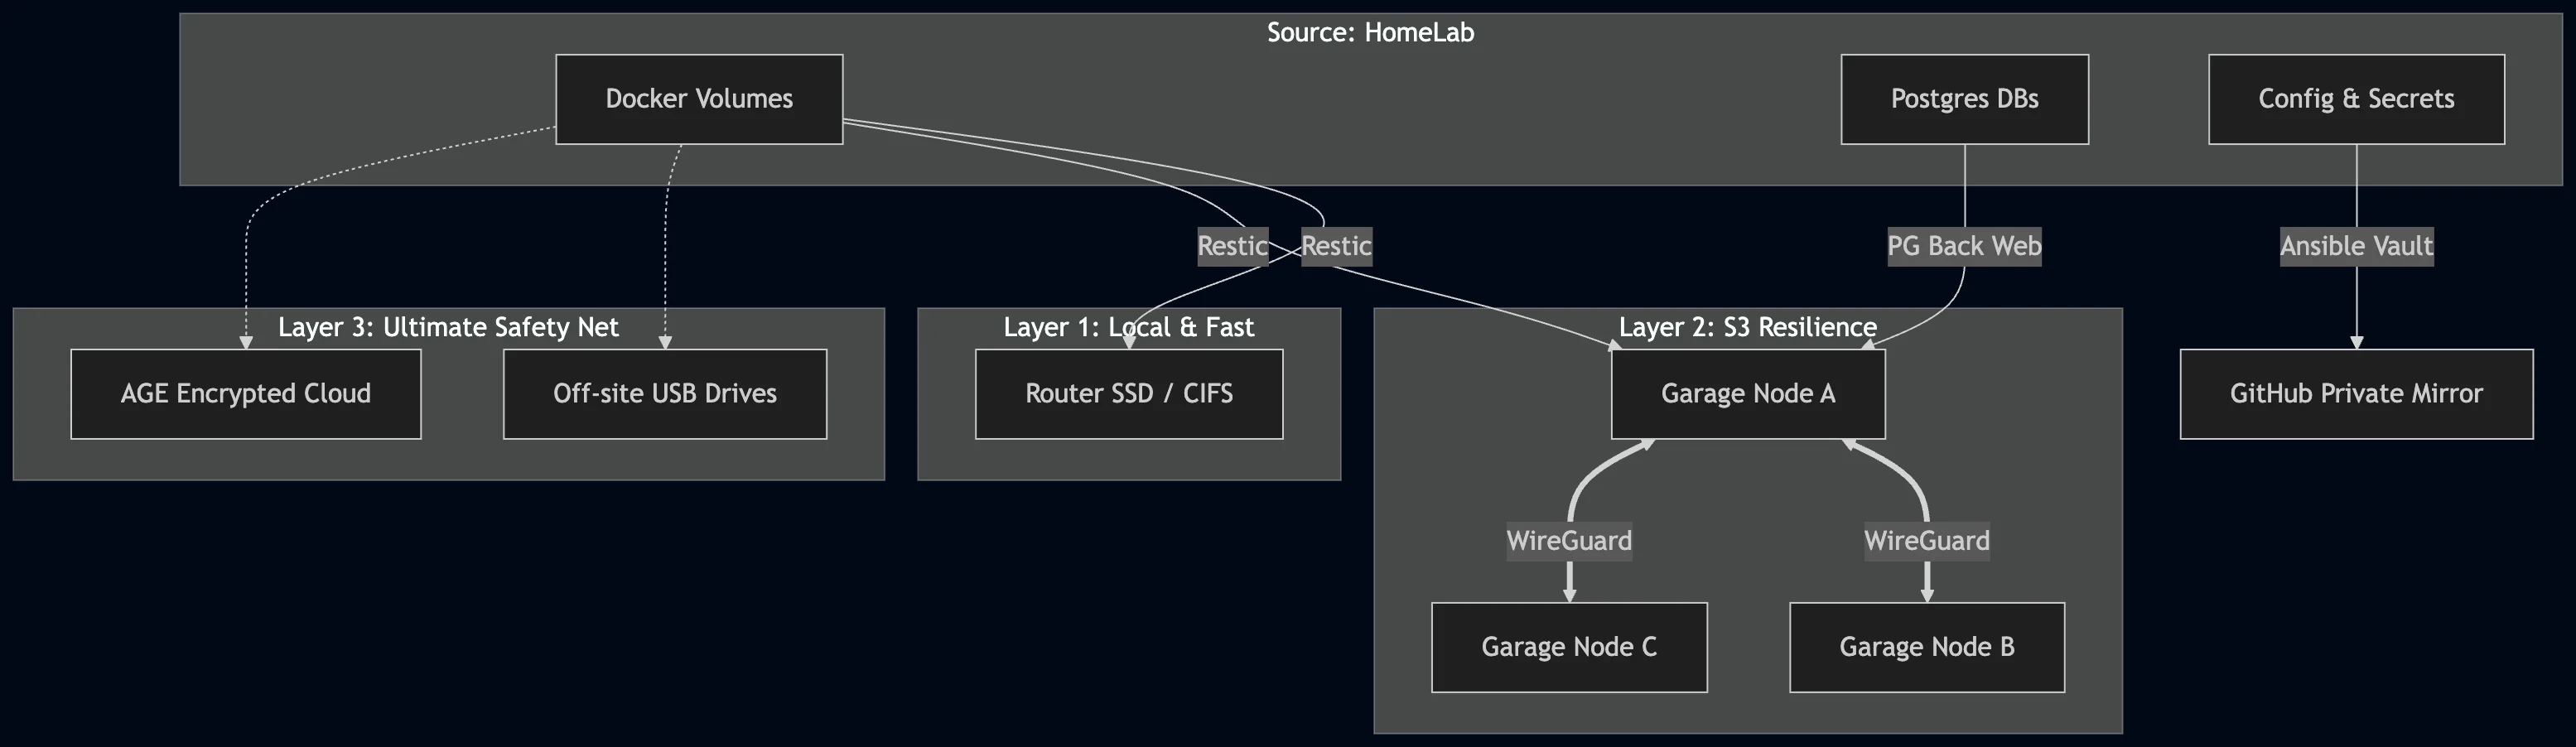
Most of these servers are located at my home. Two exceptions: servers hosted in remote locations, connected to the local network via WireGuard, primarily for the resilience of the Garage S3 cluster. More on that later.
The entire infrastructure is managed via Ansible: deployment, stack updates, configuration.
Backup Strategy: Overview
Before getting into technical details, a word on the general philosophy.
A good backup strategy rests on a simple principle: never have just one copy, or just one location. The worst-case scenario isn’t necessarily a major incident: a simple power surge can be enough to lose a drive and everything on it.
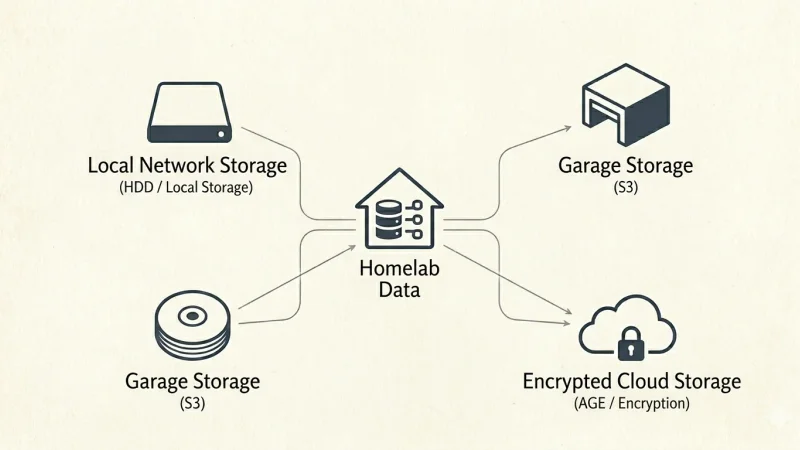
In my case, I’ve adopted a layered approach, from most critical to most common:
- Offline / off-site: for the most sensitive data, backups on USB drives stored in locations separate from my servers. Combined with encrypted cloud storage (Dropbox + AGE, key split across two YubiKeys and a paper backup). I won’t go into detail here, but this is the ultimate safety net.
- Network storage: an SSD in my router, accessible via CIFS by all my servers. Convenient for quick restorations on the local network.
- Garage S3: a distributed S3 cluster across three physically separate nodes, communicating via WireGuard. This is the primary destination for most services, resilient by design.
The last two destinations are the ones I detail in this article.
Backup of Configurations and Secrets
I use Ansible to manage my homelab. For each service, I have a folder containing the docker-compose.yml, one or more environment files (public and/or secrets), and configuration files. One playbook per service handles deployment and updates.
Sensitive files are encrypted via Ansible Vault, which allows them to be versioned in Git without exposure risk. Result: configurations and secrets are in the repository, but secrets remain unreadable without the vault key.
On the hosting side, I store my repositories in a self-hosted Forgejo instance, automatically mirrored to a private GitHub repository. Every commit on Forgejo is replicated to GitHub. An additional safety net if Forgejo were to become unavailable.
The advantage of this approach is simple: configurations and secrets are covered independently. We can therefore focus exclusively on backing up the data of the services.
Data Backup (Docker Volumes)
Restic
Restic is an open source backup tool, multiplatform and available as a Docker image. It supports multiple destinations (local disk, S3) and encrypts data by default. It’s the tool that actually performs the volume backups on each host.
For each server in the lab, I have a docker-compose.yml dedicated to Restic, invoked by the Windmill script (see next section):
$ ls -a /srv/stacks/restic/
.  ..  docker-compose.yml  .env.public  .env.secrets

$ cat /srv/stacks/restic/docker-compose.yml
---
services:
  restic:
    image: restic/restic:latest
    container_name: restic

    env_file:
      - .env.public
      - .env.secrets

    volumes:
      - type: bind
        source: /srv/volumes
        target: /srv/volumes
        read_only: true

      - type: bind
        source: /mnt/backup/${HOSTNAME}
        target: /mnt/backup/${HOSTNAME}

$ cat /srv/stacks/restic/.env.public
RESTIC_REPOSITORY=s3:{{GARAGE_URL}}/{{GARAGE_BUCKET}}/{{HOST}}
HOSTNAME={{HOST}}

$ cat /srv/stacks/restic/.env.secrets
AWS_ACCESS_KEY_ID={{AWS_ACCESS_KEY_ID}}
AWS_SECRET_ACCESS_KEY={{AWS_SECRET_ACCESS_KEY}}
RESTIC_PASSWORD={{RESTIC_PASSWORD}}
A few notes on the variables:
{{GARAGE_URL}}: the full Garage URL, with the scheme (http://ip:port). The scheme is mandatory. Without it, Restic attempts HTTPS and fails silently.{{HOST}}: the server hostname. Used to organize backups into dedicated subfolders, both on S3 and on network storage.{{AWS_ACCESS_KEY_ID}}and{{AWS_SECRET_ACCESS_KEY}}: the credentials created in Garage (detailed in the dedicated section).{{GARAGE_BUCKET}}: the name of the destination bucket.{{RESTIC_PASSWORD}}: the Restic repository encryption password. Keep it safe. Without it, backed-up data is unrecoverable.
Windmill
Windmill is a low-code script and workflow platform, self-hostable. Scripts can be written in many languages (Python, Bash, Go, Rust, Java…) and triggered via a scheduler, an HTTP call, or by email.
It’s the tool that orchestrates the entire backup process: it decides what to back up, where, and when.
Configuring services to back up
For each server, I’ve created a variable in Windmill containing a YAML file describing the services to back up:
services:
  service_1:
    targets:
      - s3
      - local
    src:
      - /srv/volumes/service_1
    needs_restart: false

  service_2:
    targets:
      - local
    src:
      - /srv/volumes/service_2
    excludes:
      - /srv/volumes/service_2/sub_folder
    needs_restart: true
    docker:
      compose_path: /srv/stacks/service_2/docker-compose.yml
In this example:
service_1is backed up to S3 (Garage) and locally (network storage), without service interruption.service_2is backed up locally only, excluding a specific subfolder. It requires a prior shutdown (needs_restart: true). Thedocker-compose.ymlpath is then required so the script can stop and restart the stack.
Retention is also configurable per service:
  service_1:
    targets:
      - s3
    src:
      - /srv/volumes/service_1
    retention:
      daily: 7
      weekly: 4
      monthly: 6
Without explicit configuration, default values apply: 7 days, 4 weeks, 6 months. Restic automatically enforces this policy via forget --prune after each backup.
The script
The script takes three input parameters: the target host, a list of services (or all to select everything), and the destination mode (local, s3, or all).
At each execution, typically triggered by a daily scheduler, it:
- Loads the YAML configuration for the target host.
- For each service to back up, connects via SSH to the host using the
windmilluser and dedicated key. - Initializes the Restic repository if not already done (
restic init), and unlocks any residual lock (restic unlock). - Runs the backup via
docker compose run restic backup. - Applies the retention policy via
restic forget --prune. - In case of failure on a service marked
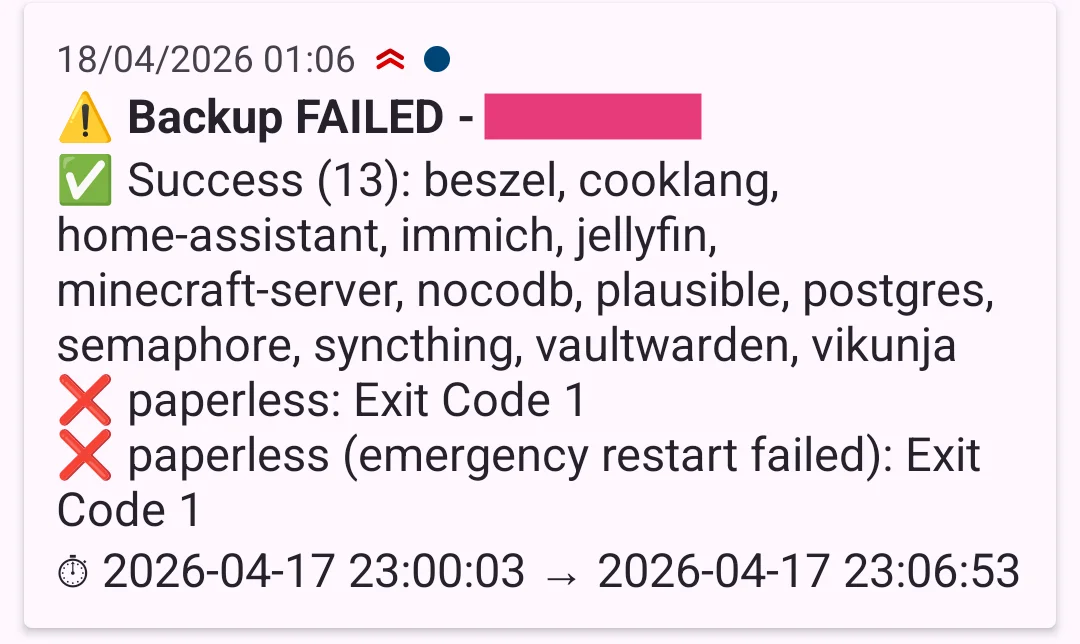
needs_restart, attempts an emergency restart of the stack. - Sends a Ntfy notification at the end of execution, summarizing successes and any errors.
Destination Volumes
Network Storage
I have an SSD in my router, exposed as a CIFS share on the local network. This is the local destination for Restic backups.
The disk is mounted under the name disk1. To make it accessible to each server, I add the following line to /etc/fstab:
//<router-ip>/disk1/backup /mnt/backup cifs guest,uid=1000,gid=1000,file_mode=0644,x-systemd.automount,x-systemd.idle-timeout=60,_netdev 0 0Then create the mount point, reload systemd, and mount:
sudo mkdir -p /mnt/backup
sudo systemctl daemon-reload
sudo mount /mnt/backup
To verify the mount is active:
findmnt /mnt/backupOutput depending on the case:
# Automatic mount (automount):
TARGET      SOURCE    FSTYPE OPTIONS
/mnt/backup systemd-1 autofs rw,relatime,...

# Manual mount (via mount):
TARGET      SOURCE                        FSTYPE OPTIONS
/mnt/backup //<router-ip>/disk1/backup    cifs   rw,relatime,vers=3.1.1,...
Or more simply: create a file from one host and verify it appears on a second.
Garage S3
Garage is a distributed storage solution, S3-compatible, designed for homelabs. I chose it as a replacement for Minio, whose successive license changes and progressive disengagement from the open source community convinced me to look for an alternative. Garage is the opposite: backed by a French community association, with no commercial ambitions.
My cluster consists of three nodes: Raspberry Pi 5s with SSD hats (512 GB each), spread across three different locations and connected via WireGuard. Each SSD has two partitions: 32 GB for the OS, the rest for Garage. The goal is to ensure data remains accessible even if an incident occurs at one site or a network outage affects one of the nodes.
The docker-compose.yml for each node:
---
services:
  garage:
    image: dxflrs/garage:v2.2.0
    container_name: garage
    restart: always
    network_mode: host

    volumes:
      - type: bind
        source: /srv/config/garage/garage.toml
        target: /etc/garage.toml

      - type: bind
        source: /mnt/garage/meta
        target: /var/lib/garage/meta

      - type: bind
        source: /mnt/garage/data
        target: /var/lib/garage/data

      - type: bind
        source: /mnt/garage/db
        target: /var/lib/garage/db

    deploy:
      resources:
        limits:
          cpus: "1"
          memory: 512m
        reservations:
memory: 128mThe SSD is mounted via fstab:
UUID=XXX /mnt/garage ext4 defaults,noatime 0 2I won’t go into detail here on configuring garage.toml or initializing the cluster. That’s not the focus of this article. The official documentation covers it well.
Creating the bucket and credentials
Once the cluster is initialized, create a dedicated bucket for backups:
$ docker exec garage /garage bucket create backup-bucket
==== BUCKET INFORMATION ====
Bucket:          4a663444...
Global alias:    backup-bucket
Then create an access key:
$ docker exec garage /garage key create backup-key
==== ACCESS KEY INFORMATION ====
Key ID:      GKdb6e91673a66448bc019c7d1
Secret key:  187...
These two values correspond to {{AWS_ACCESS_KEY_ID}} and {{AWS_SECRET_ACCESS_KEY}} in the Restic config.
Finally, grant this key read/write access to the bucket:
$ docker exec garage /garage bucket allow --read --write backup-bucket --key backup-key
==== KEYS FOR THIS BUCKET ====
Permissions  Access key                   Local aliases
RW           GKdb6e91673a66448bc019c7d1  backup-key
Host Preparation
At this point, Restic is configured on each host, network storage is mounted, and Garage is ready to receive data. What’s missing is the link between the hosts and Windmill: a dedicated user and an SSH key that the script will use to connect.
Create the windmill user
sudo useradd -m -d /var/lib/windmill -s /bin/bash windmillGenerate the SSH key
ssh-keygen -t ed25519 -C "windmill" -f windmill_keyThis generates two files: windmill_key (private key) and windmill_key.pub (public key).
Deploy the public key on the host
sudo mkdir /var/lib/windmill/.ssh
sudo mv windmill_key.pub /var/lib/windmill/.ssh/authorized_keys

sudo chown -R windmill:windmill /var/lib/windmill/.ssh
sudo chmod 700 /var/lib/windmill/.ssh
sudo chmod 600 /var/lib/windmill/.ssh/authorized_keys
Grant windmill Docker permissions
The script needs to run docker compose down/up for services marked needs_restart: true. For this, the windmill user must belong to the docker group:
sudo usermod -aG docker windmillVerify the connection
ssh -i windmill_key windmill@<host-ip>If the connection is established, the setup is correct.
Finalize
Add the private key (windmill_key) as a secret in Windmill, then delete it from the host:
rm windmill_keyHow It Works
To recap, here’s what happens concretely when a backup is triggered.
A Windmill scheduler triggers the backup script daily for each host. The script starts by loading the YAML variable for the target host. This variable defines which services to back up, to which destinations, and which ones require a prior shutdown.
For each listed service:
- If
needs_restart: true, the stack is stopped viadocker compose down. - The script connects via SSH to the host (user
windmill, dedicated key) and invokes Restic to back up the source volumes to the configured destinations: S3 (Garage), local (network storage), or both. - Restic initializes the repository if needed, unlocks any residual lock, performs the backup, then applies the retention policy (
forget --prune). - If the service was stopped, it is restarted via
docker compose up -d. In case of backup failure, an emergency restart is attempted to avoid leaving the service down.
Once all services are processed, a Ntfy notification is sent with a summary: what was successfully backed up, and any errors that occurred.
Database Backup
I have several data storage solutions in my stack: MariaDB, MongoDB, SQLite, Redis, and Postgres. I’ve chosen, where possible, to favor Postgres for services that support it. This centralizes the backup strategy around a single tool.
A few special cases:
- Redis: only used as a cache in my stack. No backup needed, but be aware that Redis can also serve as a full-fledged NoSQL database. Check how it’s used in your services before excluding it.
- MariaDB, MongoDB, SQLite: for these databases, I chose to stop the service, back up the bind mounts via Restic (like any other volume), then restart. This is acceptable when the data isn’t critical and the service can be down for a few minutes. Otherwise, a dedicated backup solution is required.
For Postgres, I use PG Back Web.
Configuration is done entirely through the interface:
- Databases: one entry per database to back up, with the standard URI (
postgres://user:password@host:port/database_name). - Destinations: S3 (Garage) or local disk via bind mount in the PG Back Web docker-compose.
- Backup Tasks: one task per database, with the target database, destination, schedule (cron expression), retention duration, and various pg_dump options (
--data-only,--schema-only,--clean,--if-exists,--create,--no-comments).
Past executions are visible under the Executions tab. PG Back Web also offers a Webhooks tab to notify backup success or failure, via Slack, Ntfy, or any other HTTP endpoint.
The Importance of Testing Backups
Your services are now backed up regularly, in multiple locations, with high resilience. The problem: the day you need to restore, you realize the backups are empty, the encryption key is gone, or the data is corrupted. All that effort, for nothing.
This is a reality: a backup strategy is rarely put in place. A resilient one, even less so. And restoration testing is even rarer.
My advice: when you set up your backups, also define your restoration procedure. And test it from time to time. The frequency depends on the criticality of the data and the effort you’re willing to invest. Once per quarter for critical services is a good starting point.
Restoring Backups
Having backups is good. Knowing how to restore them before you need them is better. Here are the concrete procedures for Restic and PG Back Web.
Restic
Restoration is a two-step process: identify the snapshot to restore, then restore it.
List available snapshots
docker compose -f /srv/stacks/restic/docker-compose.yml run --rm \
  -e "RESTIC_REPOSITORY=s3:http://<garage-url>/<bucket>/<host>/<service>" \
  restic snapshots
Typical output:
ID        Time                 Host       Paths                         Size
------------------------------------------------------------------------------
ddb07e93  2026-03-28 14:42:00  server_1   /srv/volumes/changedetection  2.255 MiB
52010d52  2026-03-29 01:05:59  server_1   /srv/volumes/changedetection  2.323 MiB
56b95dec  2026-04-17 23:30:06  server_1   /srv/volumes/changedetection  5.649 MiB
------------------------------------------------------------------------------
11 snapshots
Each service has its own Restic repository, one per folder in the S3 bucket, and one per folder in network storage. You must therefore specify the service in the repository URL.
Restore to the original location
# 1. Stop the service
cd /srv/stacks/<service> && docker compose down

# 2. Restore the most recent snapshot
docker compose -f /srv/stacks/restic/docker-compose.yml run --rm \
  -e "RESTIC_REPOSITORY=s3:http://<garage-url>/<bucket>/<host>/<service>" \
  -v /srv/volumes:/srv/volumes \
  restic restore latest --target /

# 3. Restart
docker compose up -d
To restore a specific snapshot, replace latest with the snapshot ID (e.g., 52010d52).
Inspect before overwriting
If you want to check the contents of a snapshot before overwriting existing data:
docker compose -f /srv/stacks/restic/docker-compose.yml run --rm \
  -e "RESTIC_REPOSITORY=s3:http://<garage-url>/<bucket>/<host>/<service>" \
  -v /tmp/restore:/tmp/restore \
restic restore latest --target /tmp/restorePG Back Web
Restoring a Postgres dump is done from the Executions tab in the PG Back Web interface. Each listed execution has a restore button that replays the dump on the target database.
For a manual restoration from a .sql dump retrieved from disk or S3:
psql postgres://user:password@host:port/database_name < dump.sqlConclusion: What If Everything Disappears?
You now have a solid backup strategy, data saved in multiple locations, and a tested restoration procedure. But there’s one last blind spot, often overlooked: to access your backups, you need secrets. And those secrets must survive the disappearance of your homelab.
Concretely, in the setup described here, three elements are indispensable to rebuild from scratch:
- Garage credentials (AWS key ID and secret): to access the S3 cluster and read Restic snapshots.
- The Restic password: to decrypt the backed-up data.
- The Ansible Vault key: to decrypt the configurations and secrets of services versioned on Forgejo/GitHub.
Without any one of these three elements, your backups are unusable.
Make sure these secrets are stored outside your homelab: in your password manager (itself backed up, cf. Vaultwarden + Restic 🙂), on an off-site USB drive, or in your encrypted cloud. A paper backup in a safe place isn’t a bad idea either.
A backup without access to the decryption keys is like a safe whose combination you’ve lost. The data is there, intact and completely inaccessible.
Resources
- Windmill backup script: GitHub Gist
- Restic: restic.net — official documentation
- Garage S3: garagehq.deuxfleurs.fr — documentation and quick start
- Windmill: windmill.dev — official documentation
- PG Back Web: github.com/eduardolat/pgbackweb — GitHub repository